Repairing a Damage AC Duct: DIY Guide
If you have torn or damaged air conditioning ducts, it’s important to repair them as soon as possible. A damaged duct system greatly reduces a heating and air conditioning system’s energy efficiency. Ideally, every bit of conditioned air goes directly from the air conditioner to the living space. In extreme cases, the energy lost from torn or damaged ducts far exceeds the price of the repair materials. For Palm Beach County ac repair, we recommend hiring professionals so your AC is up and running ASAP!
Common HVAC Duct Types
- Galvanized sheet metal systems are an efficient and cost-effective way to bring air into your home or business. They start with a trunk line that is often made from larger round tubes, which branch off into smaller rectangular ducts in order for it to reach all the places you want oxygen flowing through them! This type of ventilation gear also uses s hooks called “cleats” as well screw-driven connections between pieces so they stay tight while being installed – no matter what mother nature throws at us.
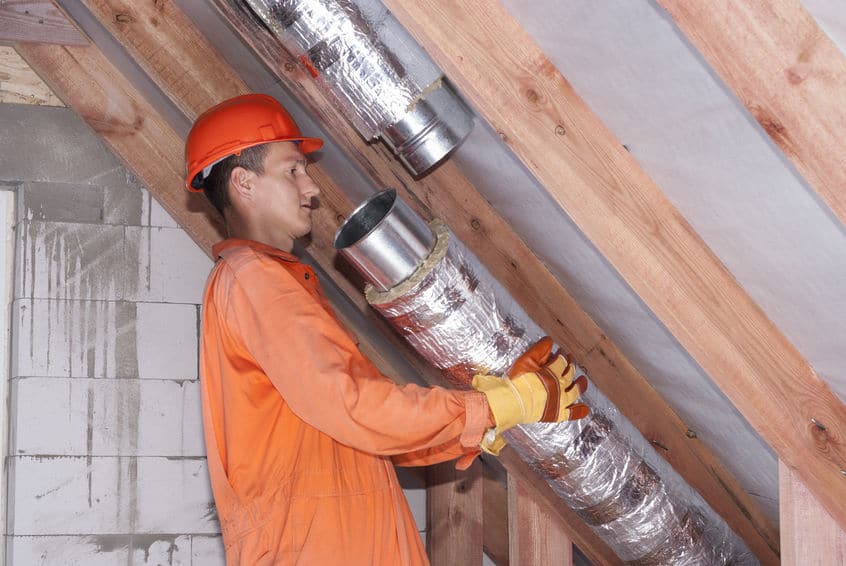
- Flex ducts are an easy-to-installation and inexpensive type of air conditioning system. There are three layers to it: the inner liner that uses a spiral wire rib, the fiberglass center layer which provides thermal protection for your home, as well as outer covering, which is known scientifically (and appropriately) as “the vapor barrier.” When installing a flex duct you slide on over this nice smooth sheet metal collar with code-approved duct tape sealing everything tight before locking down using either large zip ties or worm gear clamps called straps depending
- Fiberglass duct board is a popular option for homeowners who want to save on their heating and cooling bills. This type of insulation uses compressed fiberglass sheets with an outer layer made out of foil, which holds all the joints together so they don’t leak when installed correctly by professionals like us at A/C Care Heat & Air! We offer different thicknesses including 1-inch thick ridged panels or 2 inches if you need something stronger still; we can help determine what’s best based on your individual needs too
Repairing Galvanized Sheet Metal Ducts
- Identify the source of your leak by loosening any straps or brackets on both sides and examining where they attach. If a missing S-lock was responsible for creating this large gap, then it needs to be reconnected correctly in order to stop more leaks from happening.
- Repairing an S-lock is really quite straightforward. First, slice through the old mastic with your utility knife and remove any screws holding in place for this piece of wood that holds up against water pressure when you’re fixing leaks or taking out stakes at sea; then straighten both ends so they can slide freely out from between joint sections without getting stuck on either side–it helps if one drives fits into its notch perfectly first time around before hammering down hard enough to firmly seat all three parts back together again!
- To stop leaks in your home’s HVAC system, seal the duct joint with a 1/8 inch thick layer of code-approved mastic. Manufacturers make special designs for galvanized sheet metal joints that need extra protection against water and air pollution; use these when you’re working on this type of project.
Repairing Fiberglass Duct Board
- The fiberglass layer holds water, and foil backing prevents drainage. To get rid of excess fluid in your home’s heating system you will need to drain the ducts first by poking small holes through their outer liners with screwdrivers until they stop dripping or have no more leaking seams on them at all. Place buckets under the holes to collect the water until water stops draining into the buckets.
- With a serrated knife, cut away any wet or damaged area of the duct. The notch on each side will grab onto this reinforcement thread which can be seen as triangles sticking up outside your home’s internal structure in order to prevent further leaks.
- To make a replacement duct board, use either the old section as your template or measure out how much material is needed with an accurate measuring tape and transfer those measurements onto the new boar. Use non-serrated scissors to cut it carefully following all angles of edges so there are no rips in between cuts along its lengthwise span.
- Carefully place the patch over an open hole in your ductwork. Press on it until there are no gaps between its surface and yours, then apply some foil-backed duct tape to keep things together. Next up is making sure everything’s nice n smooth with a layer of mesh-backed mastic using a paintbrush.
Repairing Exposed Flex Duct Collars
- When the collar is exposed, it can cause problems in a duct run because there’s no tension to help keep things tight. To solve this problem add one or more hanger straps on the length of the duct.
- To disconnect the loose liner, cut it with wire cutters or pliers. Then pull away any insulation that is attached to your duct strap and adjust its outer layer so you have a proper fitment on top of what’s currently there before continuing.
- Once you have attached the outer liner, apply mastic to its butt edge and slide together until it seals. Next, lock in place with a duct strap while applying more of this adhesive around joints.
Repairing Torn Flex Duct
- Center the rip with a 6-inch section of duct tape. Seal each side by pulling it tight and working your way outwards, starting at the center point for best results.
- To ensure that your repair is lasting, apply a piece of mesh across the length. Covering this with duct mastic will hold it together while also preventing cracks later when it drys.
Replacing Damaged Flex Duct
- When removing a small section of flex duct, technicians use knives to cut through all three layers at once and follow the inner liner’s wire rib around its perimeter. They then remove these pieces carefully so as not to damage any other parts of your home’s duct system.
- Slip a splice collar into the end of your inner liner with enough overlap for taping; then wrap the connection using duct tape which will not break when installed firmly against each other. Lock these parts together until they meet flush so no gaps exist.
- To find out how much extra length you need for your new section, measure the distance between each collar of existing ducts. Add two feet if there are multiple bends in this part.
- To install a flex, start by sliding the inner liner over the splice collar. Leave about 1 inch of it exposed and seal with code-approved duct tape to make sure no air leaks through at this point in time! Next slip on another layer from your insulation that will butt up against existing pipes/mesh before tightening down using either straps or screws depending upon what type you have installed already – making sure they’re secure.
As you can see, repairing an AC duct is not as difficult as it may seem. By following the simple guide in this blog post, you should be able to fix the most common types of damage without any trouble. If you are still unsure about how to proceed or run into any problems during the repair process, don’t hesitate to contact a professional ac repair technician for assistance. Thanks for reading!