
How to Repair Wooden Furniture that Has Been Chewed by a Pet
Your pets are the cutest beings and that’s why you look after them and clean their mess. If you have a dog, he may like to chew on furniture and leave scratches and other types of damage on the wood. Fortunately, you can hire a professional to fix that for you by searching for “furniture repair near me”. Otherwise, you can try fixing that piece of furniture yourself. Here’s how you can do it:
The Process
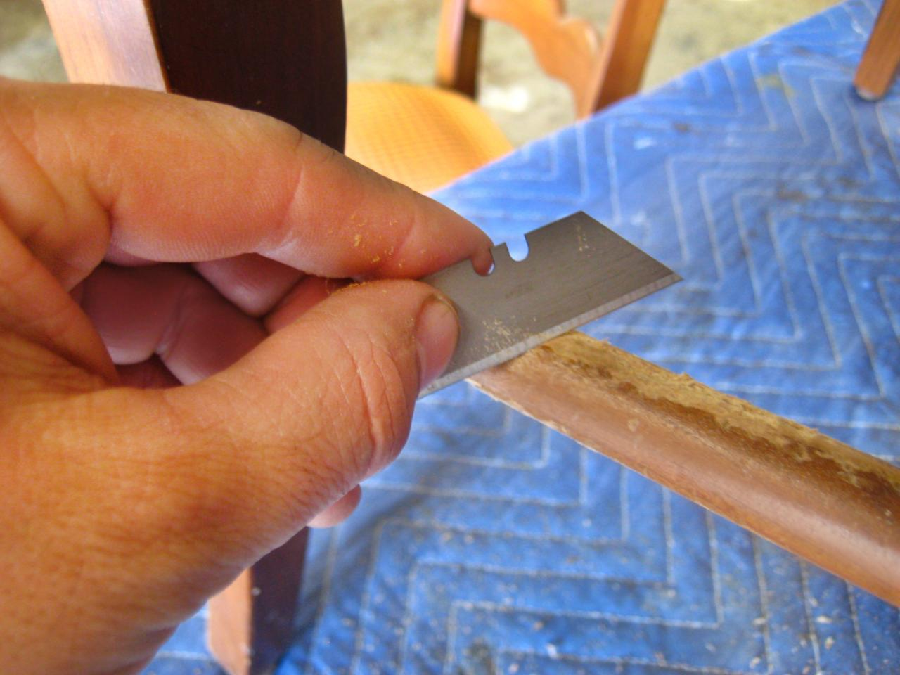
- Prepare the damaged area – Cut small hatch marks diagonally across the chewed area. You can also use X marks for your convenience. This allows you to gauge your work area. Next, pick up a utility knife and hold the blade at a 20-degree angle against the chewed area.
Secure a firm grip on the blade and scrape away frayed edges by running the blade at that angle. Make sure that you do this step carefully since you’re working with a sharp blade. Continue to scrape the area until you get rid of parts of the wood that stick out of the surface.
- Use a filler – You need an auto-body filler to fill up the mess on the chewed-up portion. It’s a two-part epoxy that needs to be mixed thoroughly for around half a minute. The brand you buy may have different instructions. This mixture is usually very thick and it’s best to mix it on a paper plate with the help of a putty knife.
The filler mixture is easily moldable and can take any shape necessary. When you apply it to your furniture, it adheres to the surface with ease and makes a strong bond. Once you scrape off excess filler. Let it dry and sand the wood piece, the filler is going to seamlessly become a part of the furniture.
Buy an auto-body filler and strictly follow the manufacturer’s instructions for mixing it. You’ll need to apply the filler numerous times until the chewed-up area is flush with the rest of the surface. Make sure that you mix small portions of the filler at a time. After each application, the mixture will take a few minutes to dry and that’s why mixing a large portion is a waste of materials.
Try to select small portions of the chewed area and apply the mixture several times till it’s flush. Repeat this as you move from one section to the other. This helps to bring out a better finish at the end. Don’t allow the filer to completely dry out before you repeat each application. If it hardens too much, scraping off excess material would be very difficult.
Once you’ve applied enough filler, take a sharp knife and slide it across the surface of the furniture to scrape away any excess filler. This helps you reshape the furniture and do a rough restoration of the chewed-up portion. If you’re not too sure about it, you can always leave a bit of excess filler. Mistakes can always be fixed in the next step, sanding the furniture.
If the damage is too deep, you can use epoxy wood putty to fill up the furniture. Use a putty knife to press the epoxy inside the recesses and holes. After you’ve filled up the gaps, you can fill in the external surface with the wood filler and scrape off excess material.
- Sand the furniture – Let the furniture rest for around half an hour so that the putty and filler can dry and harden. After that, get 150 grit sandpaper and smooth out the edges and anything hanging off the surface. Your air is to restore the furniture to its original shape and make it look seamless.
Keep sanding the surface till you can’t tell the wood apart from the filler. Once you’ve sanded the area to your satisfaction, get a smoother 220 grit sandpaper to get a smooth finish. The furniture shouldn’t feel rough after this process. Once you’re done sanding, get a microfiber cloth and wipe off residual dust and debris from the surface. The next step needs your furniture to be extremely clean.
- Fill up fine holes – Get some wax-filled stick crayons and pick up a shade that matches the color of your furniture. You can use this crayon to fill in finer holes in the furniture. Get a business card or any thick piece of paper to rub the wax into the tiny irregularities. After filling up the holes, use the paper to push in the wax and get rid of any excess material.
Keep repeating this step overall the minor irregularities that you missed with the wood filler. It is the perfect opportunity to fix your mistakes and that’s why it needs a lot of caution. Once you’re done rubbing and filling wax, you should end up with a very smooth surface. You can check it with your finger. Rub your finger over the chewed-up area and if there are still areas that have tiny holes and imperfections, put the wax crayon to work.
- Add color and clear coat – Get acrylic paint and mix in brown, white, and black tones to get the perfect shade that matches the color of your furniture. The first color should be lighter since it will act as the base. Once it’s applied and dried, you can use a darker stain to add grain strokes.
Once you’re satisfied with the color on the chewed part, get a can of clear lacquer and spray a couple of coats of clear lacquer on the furniture. Spray light coats and when it’s dry, rub the area with steel wool to bring down the sheen to the desired level.
Conclusion
Follow the above-mentioned steps carefully and you would be able to fix your furniture and make it brand new. However, this process requires you to use many unfamiliar tools and needs. If the task seems a bit daunting or if you have old furniture that has a lot of sentimental or antique value, then you should leave the task to professionals. Hire a reputed furniture repair company by searching for “furniture repair near me”.